|
|
||||||
|
|
 |
|
The most important thing to know is how the image slices produced by EZRound are placed and used in an HTML TABLE. If you understand this basic concept, then you will be able to create these effects in any HTML editor or web page design program. For purposes of this tutorial (and because this website was created with it) we will be using NetObjects Fusion. The steps may be slightly different for other programs, but the placement of the image slices is identical.
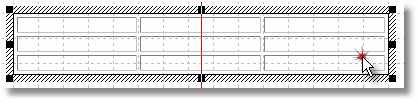
We will be creating a three row by three column table. This is because there are nine image slices created by EZRound. You can create more complex tables as long as you follow the rules for corners and content cells as laid out below. Dont worry that the nine slices make a table that may be smaller than the size you want. You will be able to resize it to fit your needs. Lets look at the table created using the table tool. After using your table tool to create it, your table should look like this:
For illustration purposes, we are going to add color and numbers to the cells so you can clearly identify what we are talking about. Now our table looks like this:
VERY IMPORTANT FACT The green cells ( 1, 3, 7 and 9 ) have the EZRound image slices placed in them using the picture tool. In this case, these slices are dropped into cells as content and you can not have anything in there with them. The yellow cells ( 2, 4, 5, 6 and 8 ) have the EZRound image slices placed as the background of the cell. This means that you can place other content in the cell (on top of the background image). This is how you get your content to appear to be framed by the table and its image slices. This is also what makes it possible for your table to expand in size (since the background images are stretched to fit the cell).
Here is a link to an excellent tutorial on the FuseDocs website that shows step-by-step instructions for completing our table assembly in NetObjects Fusion.
When we have finished the assembly for our table, it should look like this:
This table will now act as an HTML container and is ready to hold any sort of content that you want to place inside it. Just remember that you can only place content inside the yellow cells. In most cases, youll simply use the center cell. Remember that it can be a container for anything - even other tables. You should also note that the thickness of the shadow you use in EZRound (if any) along with the padding will affect how close your content can come to the edge of the outer cells. By default, EZRound uses the widest area required as the height and width of all slices, but you can adjust this using the custom slicing menu. Just be sure to preview your work and pay attention to round corners. However in most cases you can simply use the default slices that EZRound calculates.
EZRound helps you manage filenames A big consideration for web designers is that they may have more than one EZRound table on a website, so duplicate filenames can become a problem. EZRound takes care of this by asking you for a 3 or 4 character short name for your design export. This short name is then combined with standard EZRound slice names to produce the actual filename used. This causes the names to be very visual in two ways: 1) you can tell at a glance what slices belong to which design and 2) you can tell what slice goes into what position in your table. Here is an example of a design after export. If you look closely you can see that the short name ( EZ21 ) is easy to see in all the filenames and also the position it is placed in the table is a part of the name. This makes it very fast to place your image slices in a table and makes your files easy to manage because all of the design files will group together when sorted by name.
Short name: EZ21 Filename Position Slice EZ21UL.jpg Upper Left
EZ21Top.jpg Top Center
EZ21UR.jpg Upper Right
EZ21Left.jpg Left Side
EZ21Center.jpg Center
EZ21Right.jpg Right Side
EZ21LL.jpg Lower Left
EZ21Bot.jpg Bottom Center
EZ21LR.jpg Lower Right
Of course we could display that information like this!
Short Name: EZ21 Filename Position Slice EZ21UL.jpg Upper Left
EZ21Top.jpg Top Center
EZ21UR.jpg Upper Right
EZ21Left.jpg Left Side
EZ21Center.jpg Center
EZ21Right.jpg Right Side
EZ21LL.jpg Lower Left
EZ21Bot.jpg Bottom Center
EZ21LR.jpg Lower Right
So how did we get the simple table above to appear inside our EZRound frame? Simple. We used the COPY function to copy the table to the Windows clipboard and then we PASTED it into the center cell of our EZRound table! This great effect just took a few seconds to create.
A container is just that - a container... Your new frame can be used to hold any content that you might have on your web page. The navigation menu on the left of this page is held in an EZRound container. The table above is. You can even have a photo...
One more tip... Once you have your HTML TABLE container assembled, you can just use the COPY and PASTE function (in most programs anyway) to make a copy of it and use it in another place. You can also just edit the properties of the cells to change file names on the copy to save time switching designs.
... The End ...
This tutorial is copyrighted and may not be reproduced or linked without permission. If you are interested in this material, please contact us. |
|||||||||||||||||||||||||||||||||||||||||||||||||||||||||||||||||||||||||||||||||||||||||||||||||||||||||||||||||||||||||||||||||||||||||
 The first step is to use


| [Home] [NetObjects Tutorials] [Universal Import] [TableBasics] [Containers] [Adding Assets in NOF] [Centering Pages] [Full Page Borders] |
|
Copyright © 2003 - 2022 :: LANSRAD :: All Rights Reserved |